• Skip to primary navigation
  • Skip to main content
  • Skip to primary sidebar
RMM logo 2
Get All Flash File
Menu
  • Home
  • Training
    • Offline Training
      • Kolkata
      • Kolhapur
      • Patna
    • L1: Basic Software & Hardware
    • L2: Advanced Software & Hardware
    • L3: Super Advanced UFS
    • iPhone Training
  • Solution
    • Flash File
    • Flash Tool
    • Driver
    • Combination
    • FRP
    • Root
    • Hard Reset
    • Hardware
  • Premium Flash File
    • Premium Flash File
    • Fast Download Server
    • Android Dump Files
  • Log In

LYF Jio F320B Flash File (Stock ROM)

LYF Jio F320B Flash File (Stock ROM)

November 18, 2020 Leave a Comment

Download LYF Jio F320B Flash File to install KAIOS OS on your phone.

  • LYF-F320B-002-02-58-140422 (latest)
  • LYF-F320B-002-02-56-250322
  • LYF-F320B-002-02-49-301121  
  • LYF-F320B-002-02-37-130921 
  • LYF-F320B-002-01-83-131020 
  • QFlash Tool

Boot Key: ‘*’

Note: Steps to Enable Diag Port in Jio Phones

How to Flash LYF Jio F320B:

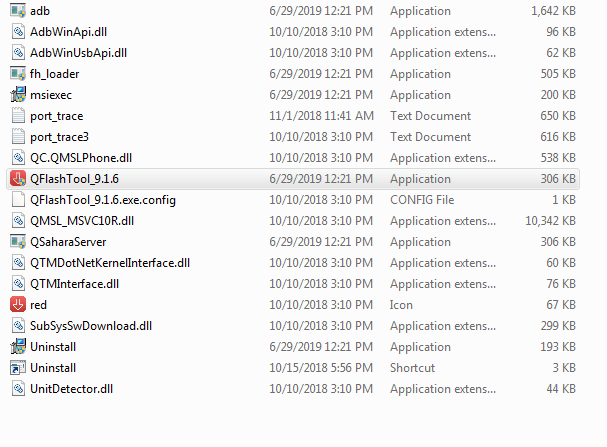
1- Download LYF Jio F320B Flash file which consists of File, tool & Driver.
2- Install Driver
3- Connect Phone holding Boot key: * mode to cross-check driver installation. It will make port named “Qualcomm HS-USB Diagnostics 9008”.
4- It means the driver has been installed successfully.
5- Install Flash Tool, which will install a shortcut on Desktop named Qflash_Tool_9.1.7.

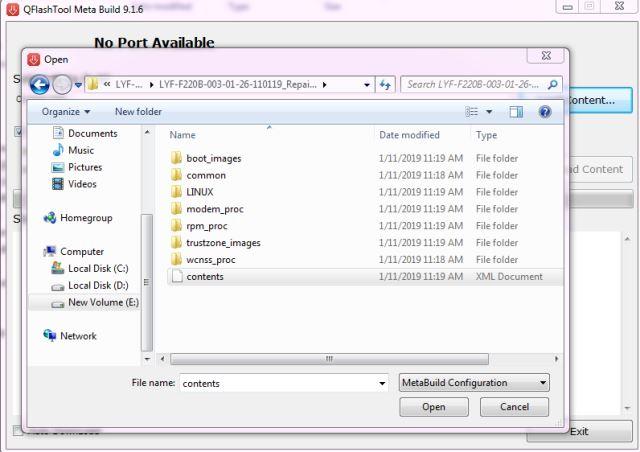
6- Connect phone (Press * as Boot key)& Click on Load Content and from Flash File Folder select Content.xml


7- It will show Port in tool.
8- Click on Download Content to start Upgrading.


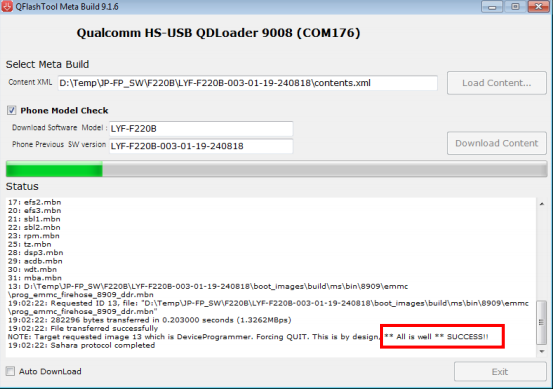
9- Wait till done appears.
10- After upgradation, device will shift to download mode.
11- Disconnect Phone & reinsert battery.

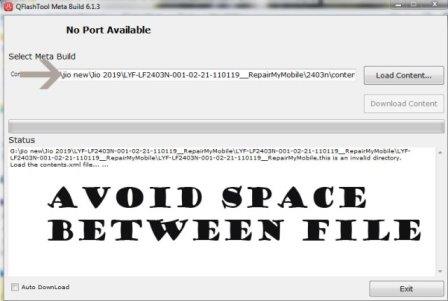
If flashing Fails or does not start, then there must be a gap between the words while choosing flash file. Rename the folder.

As in Qualcomm Flashing, there must be no gap in between the words.

jio new should be replaced by jio_new or jionew.


Filed Under: Android Flash File Database

Xiaomi Anti Relock Solution: Solved

November 17, 2020 Leave a Comment

Most of the Xiaomi Phones after resetting Mi Account get relock when connected to Internet.

We will use UMT to get rid of Mi Phone getting Relocked.

Solution: Mi Account Relock after connecting Internet;

1- Run UMT QC Fire (Latest).

2- Then Reset Mi Account of the phone.

3- Phone will reboot, When Menu appears in the phone.

4- Make sure to not insert sim & no internet connectivity to the device.

5- Go to Setting, Tap 7 times on Build version. It will enable the developer mode.

6- Now in Power on mode. Connect phone to the PC. Make sure to install Fastboot driver on pc for further operation.

7- Using Umt Qc fire, now click on Anti-relock tab.

This will reset the Relock of the device.

Now, you can insert SIM & connect phone to the internet.


Filed Under: Android Flash File Database

Samsung Galaxy M01 Core SM-M013F Flash File (Stock ROM)

November 17, 2020

Download Samsung Galaxy M01 Core SM-M013F Flash File and use Odin tool to flash:

  • M013FDDU7AWA1
  • M013FDDS6AVA2
  • M013FDDU5AUJ2
  • M013FDDU4AUG1
  • M013FDDU3AUD2
  • M013FDDU1ATI3
  • Odin tool
  • Samsung Kies

How to Flash Samsung Galaxy M01 Core SM-M013F:

Make sure your device is atleast 30 percent charged to perform flashing.

  • Install Samsung kies to make connectivity between Phone & Odin flash tool.
  • Switch off the mobile.
  • Press the Power + volume down + home button.
  • Android symbol will appear, now press volume up to enter into the download mode.
  • Unzip the Samsung Galaxy M01 Core SM-M013F file.
  • Now open the Odin flash tool.
  • Select flash file in PDA or AP.
  • After selection mobile will get detected automatically and will display a message Added.
  • Now click start on system & installation is in process.
  • After installation mobile restart of its own.

Filed Under: Android Flash File Database

Redmi 6a Baseband Unknown: solved

November 11, 2020

Redmi 6a Baseband unknown can be either Hardware or Software.

Mostly, the issue is of Hardware.

But in case of software, you had to flash with its latest version File to restore baseband. In a case, if it fails then it can be resolved by Hardware.

Demo pic of Reballing & making Jumper:

Redmi 6a baseband unknown

1- Reball MT6177MV.

2- Make a Jumper under IC to the Greenish layer as in the pic.

Afterwards, device will regain its Baseband.

Filed Under: Hardware

Mobile Hardware Course

November 5, 2020

RepairMyMobile-Training

Join Training for Rs.999

Android Training
iPhone Training
Laptop Training
Topics Covered: 
  • COMPONENT ON MOTHERBOARD:
Remove capacitor, Resistance & coil by safe method.
Remove battery & LCD connector by safe method.
Remove filter and mic ic.
  • All IC and Section
  • Working of each IC
  • Charging, Mic, Network and Speaker
  • Schematic reading
  • How to connect ISP
  • Reballing , Broken balls fix & Pasted IC
  • Fix CPU and EMMC

Fees & Support: 

  • Offer Price: Rs. 999 + GST

Doubt Clearing Classes: Daily 1 Hour

Support: 1 Month

Note: Users have to renew their subscription to access Training Videos & Support after 1 Month.

Training Batches: 

  • Hindi & English

Timing:   

  • 7: 00 PM to 8: 00 PM

Note: Timing can vary. 

Live Demo of Hardware Training:

Filed Under: Training

Oppo F11 Pro Pattern Unlock without Data Loss

November 5, 2020

This post cover all aspects which will guide you to Unlock Pattern or Reset Gmail account of Oppo F11 Pro.

In order to do so, you will need Hardware expertise (Jumper) with UFI or Easy Jtag Plus.

Steps to Unlock Pattern or Gmail of Oppo F11 Pro:

1- First you have to Look out for ISP Pinout of Oppo F11 Pro.

oppo-f11-pro-isp-pinout

2- Then make jumper from Dato, CLK, CMD & GND to ISP Adapter then connect Adapter to UFI Box.

3- Now, switch to UFI Emmc Toolbox interface and click on Identify Emmc. If the Jumper has done properly, then ufi interface will display Android System info.

4- Then, Switch to USERAREA Part which will be on top left side.

5- Click on Special Task and Select Oppo[Master Clear]. Out of the option appearing, choose Wipe Data & App Data.

6- When UFI log display, Oppo[Master Clear]…Done.

7- Device has been unlocked.

8- Remove Jumper & assemble ISP to the phone.

9- Switch on device.

Filed Under: Hardware

  • « Go to Previous Page
  • Page 1
  • Interim pages omitted …
  • Page 556
  • Page 557
  • Page 558
  • Page 559
  • Page 560
  • Interim pages omitted …
  • Page 946
  • Go to Next Page »

Primary Sidebar

Join Free Demo Classes!!!

Free demo classes
demo group

Recent Posts

  • Realme 9i 5G RMX3612 UnlockTool UFS Dump File
  • Vivo T4x PD2445F UFS Dump File
  • Redmi Note 9 (10x 4G) Merlin EMMC Dump File
  • Oppo A3x 5G CPH2641 Flash File (Stock ROM)
  • Moto G96 5G XT2531-2 UFS Dump File

RMM Other website & App

training.repairmymobile.co

RMM Android App

Join Telegram Group

Repair My Mobile

Our Services

Privacy Policy

Term & Condition

Contact us

About us

Sitemap

Join Our Community

Facebook Youtube Instagram Linkedin Twitter Whatsapp

Contact

sidhartha@repairmymobile.co

+91-9060 2999 19

Mon-Sat:10:00am to 6.00pm

Official QR Code

Official Payment no.

Course: 8935939022

Call/WhatsApp: 91-893-593-9022

Paypal: vijaytech89@gmail.com


Note: Repair My Mobile
Official Payment no.

Bakarganj, Patna, Bihar 800004

Payment Partner

Copyright © 2025 RMM. Designed by RMM All rights reserved.

Click to Chat