• Skip to primary navigation
  • Skip to main content
  • Skip to primary sidebar
RMM logo 2
Get All Flash File
Menu
  • Home
  • Training
    • Offline Training
      • Kolkata
      • Kolhapur
      • Patna
    • L1: Basic Software & Hardware
    • L2: Advanced Software & Hardware
    • L3: Super Advanced UFS
    • iPhone Training
  • Solution
    • Flash File
    • Flash Tool
    • Driver
    • Combination
    • FRP
    • Root
    • Hard Reset
    • Hardware
  • Premium Flash File
    • Premium Flash File
    • Fast Download Server
    • Android Dump Files
  • Log In

LYF Jio F30c Working Flash File (Stock ROM)

LYF Jio F30c Working Flash File (Stock ROM)

March 15, 2018

Download LYF JIO F30c Flash File to install KAIOS OS on your phone.

  • LYF_F30C-001-10-40-020322
  • LYF_F30C-001-10-38-291121   (Password Protected: Buy Now)
  • LYF_F30C-001-10-23-261119  (Latest 2020 Flash File)
  • QPST Tool

Note: Steps to Enable Diag Port in Jio Phones

Boot Key: Volume UP + Down

How to Flash LYF Jio F30c:

1- Download LYF F30c Flash file
2- Download QPST tool.
3- Install Qualcomm driver.
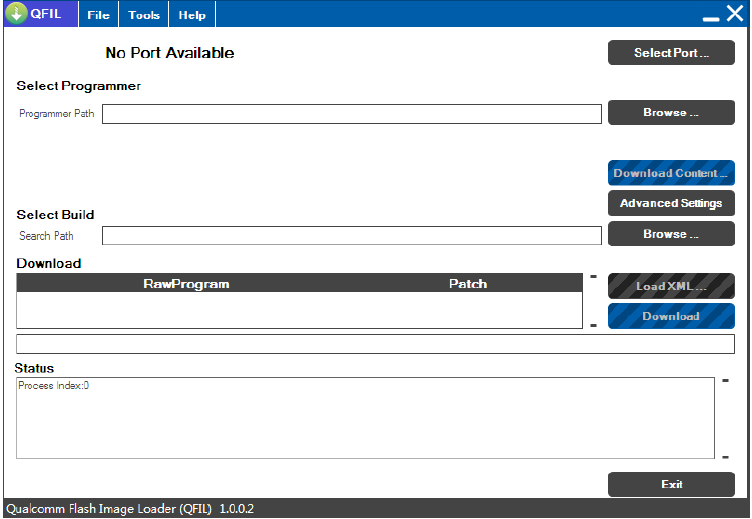
4- Run QPST tool.

5- Add new port. Connect phone holding boot key.  (Check device manager)
6- Click browse & select Stock ROM file.


7- Select Download and wait for the flashing to finish.

If flashing Fails or does not start, then there must be a gap between the words while choosing flash file. Rename the folder.

As in Qualcomm Flashing, there must be no gap in between the words.

jio new should be replaced by jio_new or jionew.


Filed Under: Android Flash File Database

LYF Jio LF2403 Working Flash File (Stock ROM)

March 15, 2018

Download LYF JIO LF2403 Flash File to install KAIOS OS on your phone.

  • LYF-LF2403-001-02-10-221019 (Latest 2020 Flash File)
  • Qflash Tool

Note: Steps to Enable Diag Port in Jio Phones

Boot Key: “*#”


LYF-LF-2403-Flash-File

How to Flash LYF Jio LF2403:

1- Download LYF LF2403 Flash file which consist of File, tool & Driver.
2- Install Driver
3- Connect Phone in Off mode holding boot key *# to cross check driver installation. It will make port named “Qualcomm HS-USB Diagnostics 9008”
4- It means driver has been installed successfully.
5- Install Flash Tool, which will install shortcut on Desktop named QFLASH Tool.


6- Connect phone & Click on Load Content and from Flash File Folder select Content.xml


7- It will show Port in tool.
8- Click on Download Content to start Upgrading.
9- Wait till done appears.
10- After upgradation, device will shift to download mode.
11- Disconnect Phone & reinsert battery.

If flashing Fails or does not start, then there must be a gap between the words while choosing flash file. Rename the folder.

As in Qualcomm Flashing, there must be no gap in between the words.

jio new should be replaced by jio_new or jionew.

Filed Under: Android Flash File Database

LYF Jio LF2403n Flash File (Stock ROM)

March 15, 2018

Download LYF Jio LF2403n Flash File to install KAIOS OS on your phone.

  • LYF-LF2403N-001-02-45-240221
  • LYF-LF2403N-001-02-27-180919 (Latest 2020 Flash File)
  • Qfil Tool

Note: Steps to Enable Diag Port in Jio Phones

Boot Key: “* & #”

LYF-LF-2403n-Flash-File

How to Flash LYF Jio LF2403n:

1- Download LYF LF2403n Flash file which consist of File, tool & Driver.
2- Install Driver
3- Connect Phone in OFF mode to cross check driver installation & Press Boot key * & # while connecting. It will make port named “Qualcomm HS-USB Diagnostics 9008”
4- It means driver has been installed successfully.
5- Install Flash Tool, which will install shortcut on Desktop named QFLASH Tool.


6- Connect phone & Click on Load Content and from Flash File Folder select Content.xml


7- It will show Port in tool.
8- Click on Download Content to start Upgrading.
9- Wait till done appears.
10- After upgradation, device will shift to download mode.
11- Disconnect Phone & reinsert battery.

If flashing Fails or does not start, then there must be a gap between the words while choosing flash file. Rename the folder.

As in Qualcomm Flashing, there must be no gap in between the words.

jio new should be replaced by jio_new or jionew.

Filed Under: Android Flash File Database

LYF Jio F50Y Working Flash File (Stock ROM)

March 15, 2018

Download LYF JIO F50y Flash File to install KAIOS OS on your phone.

  • LYF-F50Y-001-03-28-280322
  • LYF-F50Y-001-03-26-201221  (Password Protected: Buy Now)
  • LYF-F50Y-001-03-20-010421 (Password Protected : Buy Now)
  • LYF-F50Y-000-03-05-231019  (Latest 2020 Flash File)
  • Huiye Flash Tool

Note: Steps to Enable Diag Port in Jio Phones

Boot Key: Center Key or Volume Up+ Down + Power


LYF-F50y-Flash-File

How to Flash LYF Jio F50Y:

1- Download LYF F50Y Flash file which consist of File, tool & Driver.
2- Install Driver
3- Connect Phone in Off mode and Press Boot key Up Dpad+ Down Dpad or center key to cross check driver installation. It will make port named “Qualcomm HS-USB Diagnostics 9091”
4- It means driver has been installed successfully.
5- Install Flash Tool named Huiye Download Tool for Reliance (After Sales).

6- Click on Select and assign path of firmware
7- It will show 6 file in it, select Get_backup0 (You can select any of them).

8- it will then display the Flash File folder path
9- Connect phone which will enable Download button.

10- Software Upgrade starts.
11- On its completion, Violet area will turn into green and will display a message “Pass” .

If flashing Fails or does not start, then there must be a gap between the words while choosing flash file. Rename the folder.

As in Qualcomm Flashing, there must be no gap in between the words.

jio new should be replaced by jio_new or jionew.

Filed Under: Android Flash File Database

LYF Jio F90m Flash File (Stock ROM)

March 15, 2018

Download LYF JIO F90m Flash File to install KAIOS OS on your phone.

  • LYF-F90M-000-03-51-141221
  • LYF-F90M-000-03-31-121219  (Password: Lyff90m00_Repairmymobile)
  • QFlash Tool
  • LYF-F90M-000-03-30-101019

Note: Steps to Enable Diag Port in Jio Phones

LYF JIO F90m QCN File Tested:

  • Jio_F90m_QCN

Password: RepairMyMobile.in_F90mqcn

Boot Key: Center Key

How to Flash LYF Jio F90m:

1- Download LYF F90m Flash file which consists of File, Tool & Driver.
2- Install Driver
3- Connect Phone in off mode holding Center Key to cross-check driver installation. It will make port named “Qualcomm HS-USB Diagnostics 9091”
4- It means the driver has been installed successfully.
5- Install Flash Tool named Megafone SW Download Tool.

6- Click on Search File & assign the path of the flash file.


7- Out of four File appearing, select prog_emmc_firehose_8909_lite (2nd File)


8- Connect Phone & press Center Key as Boot key & Click on Download.
9- Phone will switch to EDL mode directly and Upgrade starts.
***Make sure no space is there in File Path.

Flashing using Flash tool:

If flashing Fails or does not start, then there must be a gap between the words while choosing flash file. Rename the folder.

As in Qualcomm Flashing, there must be no gap in between the words.

jio new should be replaced by jio_new or jionew.

Filed Under: Android Flash File Database

Lava Y10 Flash File (Stock ROM)

March 15, 2018

Download Lava Y10 Flash File:

  • Lava_Y10_MT6737M_S101_20170621
  • SP Flash Tool
  • MTK Driver

How to Flash Lava Y10:

Install MTK Driver.
1- Download the package & Extract SP Flash tool.
2- Out of the icon appearing, Double click on Flash_tool.exe
3- it will launch the tool on your PC, Click on Scatter-Loading appearing on the Right side of the tool.
4- Now, assign the firmware which will be in form “Android_scatter.txt”.
5- Click on Download to start flashing.
6- Switch off your Mobile and Connect it to PC by pressing Volume down or Volume up key.
7- It will lead you to Successful Flashing

Filed Under: Android Flash File Database

  • « Go to Previous Page
  • Page 1
  • Interim pages omitted …
  • Page 902
  • Page 903
  • Page 904
  • Page 905
  • Page 906
  • Interim pages omitted …
  • Page 924
  • Go to Next Page »

Primary Sidebar

Join Free Demo Classes!!!

Free demo classes
demo group

Recent Posts

  • Sasmung M05 SM-M055F Flash File (Stock ROM)
  • Samsung M14 5G SM-M146B UFS Dump File
  • Samsung A14 5G SM-A146B UFS Dump File
  • Sasmung Galaxy F05 SM-E055F Flash File (Stock ROM)
  • Samsung Galaxy M55s SM-M558B Flash File (Stock ROM)

RMM Other website & App

training.repairmymobile.co

RMM Android App

Join Telegram Group

Repair My Mobile

Our Services

Privacy Policy

Term & Condition

Contact us

About us

Sitemap

Join Our Community

Facebook Youtube Instagram Linkedin Twitter Whatsapp

Contact

sidhartha@repairmymobile.co

+91-9060 2999 19

Mon-Sat:10:00am to 6.00pm

Official QR Code

Official Payment no.

Course: 8935939022

Call/WhatsApp: 91-893-593-9022

Paypal: vijaytech89@gmail.com


Note: Repair My Mobile
Official Payment no.

Bakarganj, Patna, Bihar 800004

Payment Partner

Copyright © 2025 RMM. Designed by RMM All rights reserved.

Click to Chat